While I tend to shy away from the overt worship and display of crosses, I couldn’t pass up this image of a tiny alyssum plant growing in the grout of a brick walkway. This little bloomer was no more than 1/2″ tall.

Isn’t it amazing how we can go from one weather extreme to the next, here in Redding. Up until a week ago, we were in the depths of drought, now we are awash in wonderful rain, and the mountains are covered with snow! I pray that Yah will continue to bless us with precipitation, no matter its form until we are caught up in our yearly level.

Now, I might have jumped ahead a bit, but I already have some seeds started. I have broccoli, tomatoes, basil, castor bean and five o’clock flowers started in this flat.
You can purchase this growing set up at Walmart, Home Depot, Lowe’s or at many nurseries. This was a three flat kit that came with three waterproof trays, three seedling inserts of 72 holes each, and three clear tops to maintain humidity for about $9. I always punch holes along all sides of the clear dome with a hole punch to increase airflow.
I would suggest getting the best potting soil you can afford, but do not get soil that has fertilizer incorporated in it, like Miracle Gro. I use FoxFarms soils, which I get at Creekside Gardens on Twin View Blvd. If you have a screen handy to screen out chunks and lumps to make germination more even, you might want to do so.
Make sure you label your seedlings, putting a date on the stake will help keep track of the time until seeds germinate. You can make lots of inexpensive labels out of a broken vinyl window blind. The slats cut easily with a pair of scissors and they are easy to write on with a pencil.
I use these labels all over the garden, they will get brittle over time, but they don’t rot in a season like wood. If you have a heavy infestation of snails, the pesky gastropods can eat off the graphite, but you will want to keep up on control of these slimy pests in your precious vegetable garden before they have a chance.
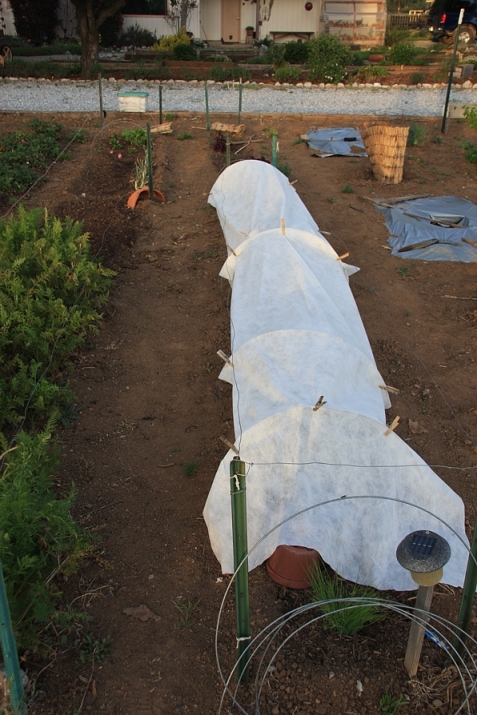
 If you want to get ahead of your cold spring season, you might want to invest in row covers until the nights are safe from killing frost.
While you can order hoops from many nursery supply catalogs, I make mine from the stiff wire that is used in chain link fences, it comes in a roll that, when cut in half circles with bolt-cutters, is the perfect size and shape for your rows.
The cloth cover is cheapest ordered from places like Johnny’s Seed http://www.johnnyseeds.com/catalog/subcategory.aspx?category=292&subcategory=334 or Territorial Seed Company http://www.territorialseed.com/prod_detail_list/171 . But you’ll be buying in bulk, so for just a few feet of cover you may need to look around town.
I purchased mine from the now defunct Bracken Gardens, but call around, some of the nurseries might carry it. I have found this product helpful to maintain moisture levels in newly seeded rows, to protect against frost and even to provide some shade during extremely hot spells.
I do not use the metal pins to fasten the fabric to the soil as it damages the fabric, and I like to make this stuff last as long as I can. I use wood clothes pins to hold it to the wire hoops.
I’ve kept this material, using it over and over for nearly five years by careful care and storage. If it gets soiled, it can be washed in the washing machine on delicate setting, but don’t put it in the dryer.
In the image there are also two spots where I experimented with silver plastic mulch, touted to keep insects at bay from your plants. I was unimpressed with this product and it was pricey. I don’t recommend it.
 Another handy trick for protecting some of your larger seedlings is by taking small styrofoam cups, cutting out the bottoms and placing them large end down around your plant. Hill up the soil around the outside to hold them fast and the cups will protect your tender seedling from rain, insect and wind damage. Just pull off the cup after the plants have established themselves.
These seedlings are baby potato plants I grew from seed that set on my potatoes a couple of years ago. I ended up with white/yellow potatoes, like their Yukon Gold parents. Growing potatoes from seed is fun!
Let’s make sure we give thanks that our precipitation has been restored to us! I pray that the lakes will fill to the brim so we can water our gardens to nourish our bodies this year!
See you next Sabbath!
Paula said,
February 23, 2009 at 5:35 pm
Hi again Mitsy-We just purchased our first seed starter kit, complete with dome. Thanks for the tip on poking holes in it so it can increase airflow better too. I’ll be referring to this blog often.
See ya Sabbath!